No edit summary Tag: Visual edit |
No edit summary Tag: Visual edit |
||
| Line 65: | Line 65: | ||
=== Practice === |
=== Practice === |
||
| − | ==== Example 1: Golden rotated text with black background ==== |
+ | ==== Example 1: Golden rotated text with black background. ==== |
[[File:Golden text 2.png|centre|thumb|220x220px]]Let's put a golden slightly rotated text with the black background on some random wall. To do this, we need to select the decoration tool and click the wall directly in front of us. Then type some text in Msg / Img / Video field and paste the necessary CSS style in the style, which in our case would be: |
[[File:Golden text 2.png|centre|thumb|220x220px]]Let's put a golden slightly rotated text with the black background on some random wall. To do this, we need to select the decoration tool and click the wall directly in front of us. Then type some text in Msg / Img / Video field and paste the necessary CSS style in the style, which in our case would be: |
||
color: gold; background: black; transform: rotate(-30deg)[[File:Golden text 1.png|thumb|220x220px|centre]] |
color: gold; background: black; transform: rotate(-30deg)[[File:Golden text 1.png|thumb|220x220px|centre]] |
||
| − | ==== Example 2: Kitten image with green background, tooltip and a link to a private giveaway ==== |
+ | ==== Example 2: Kitten image with green background, tooltip and a link to a private giveaway. ==== |
[[File:Kitten.png|centre|thumb|220x220px]] |
[[File:Kitten.png|centre|thumb|220x220px]] |
||
Let's put an image of a kitten on the wall! To do that, all we have to do is insert a link to the image in the Msg / Img / Video field, in our case it is https://ichef.bbci.co.uk/images/ic/720x405/p0517py6.jpg. |
Let's put an image of a kitten on the wall! To do that, all we have to do is insert a link to the image in the Msg / Img / Video field, in our case it is https://ichef.bbci.co.uk/images/ic/720x405/p0517py6.jpg. |
||
| Line 92: | Line 92: | ||
- [[Editing Event Objects]] |
- [[Editing Event Objects]] |
||
| + | |||
| + | === Practice === |
||
| + | |||
| + | ==== Example 1: A door that can be opened with a lever. ==== |
||
| + | [[File:Door-0.png|centre|thumb|220x220px]] |
||
| + | Let's see how objects can interact with each other, e.g. how a lever can open a door. |
||
| + | |||
| + | First things off, we should select the Event tool and create a door by clicking a wall in front of us. It already has two default images set for its closed and opened state - you can change those to any images you like or choose from the catalog of objects on this Wiki, e.g. [[Doors|catalog of doors can be found here]]. |
||
| + | |||
| + | Each object in a dungeon has its own unique ID which is used for other objects to interact with it. You can see it at the top when editing object settings. |
||
| + | [[File:2019-02-09 (17).png|centre|thumb|220x220px]] |
||
| + | Now we need to create a switch at some other place in the same way and make it trigger our door whenever it is used. It will already have certain default images set upon creation - just like any other object you can create. |
||
| + | |||
| + | When editing your new switch's settings, you can notice that some field there are different than those of the door, e.g. a switch can have target IDs! This is exactly the field we need to make our lever open our door - just insert the door ID here, e.g. 477 based on the screenshot above. You can also insert multiple IDs here separating them with comma to make a single switch trigger multiple objects at once - quite cool, huh? |
||
| + | [[File:Switch.png|centre|thumb|220x220px]] |
||
| + | Try to interact with your new switch now and see how it opens and closes the door. |
||
| + | |||
| + | You can also modify object's looks using the style field in a similar way as you would do with decorations. Try inserting the following in the style field of your switch and see what happens: |
||
| + | |||
| + | opacity: .5; transform: rotate(90deg) scale(.5); |
||
| + | [[File:Modified switch.png|centre|thumb|220x220px]] |
||
| + | This transformation will make the switch half-transparent, half the size and rotate it by 90 degrees. |
||
== Dungeon settings == |
== Dungeon settings == |
||
Revision as of 20:42, 9 February 2019
Intro
Ready to create your own dungeon? Then you are at the perfect place to start.
This tutorial will help you learn the basic of dungeon creation in Dungeon Sandbox, so you can quickly get started with your new creation.
As a dungeon creator, besides the default options available to all players, you have an access to a special set of options which allow you to create and modify your dungeon.
Minimap
Before we explore the creator options, let's take a look at our starting location.

If you open your minimap, you can see that your initial position is X51 Y51. This is also a default starting position for any new player that enters your dungeon. No one besides you and a co-creator can enter it before you publish it.
You also appeared in the dungeon facing North which is a current starting direction of any new player. Note that each direction has its own number as displayed on the walls around you: North - 1, East - 2, South - 3, West - 4. Direction numbers are used for setting starting direction or, let's say, destination direction for portals in your dungeon. Starting position and direction can be changed in the dungeon settings.
Coordinates can take values from 0 to 255, so you can really create a huge dungeon - that is, of course, if your fantasy is that huge too.
There are a few more thngs worth mentioning concerning the minimap:
- The map is looped, so if you go north from X51 Y255, you will end up at X51 Y0.
- You can create and remove tiles while viewing the minimap - just right click the spot you'd like to edit.
- You can left click tiles on the minimap to instantly teleport to any location (only as a creator).
- You can use M keyboard button to quickly open the minimap.
Creator options
Now that we figured out our location, let's get to studying the creator options which allow you to create your dungeon and modify it in many different ways. Click the following button to switch from player to creator options:

Types of creator tools
Creator options (tools) are divided into 2 categories - Primary Tools and Secondary Tools.
Primary tools are the ones any creator must use to to make a dungeon and Secondary tools are optional ones which can be used to add some extra features to the dungeon, e.g. event messages which appear when a player performs certain actions.
The aim of this tutorial is to teach you the basics of dungeon creation and thus we will only cover primary tools here, but you can visit following sections of the Wiki to learn about the secondary tools as well:
- Area Textures
Click the primary tools button to view available primary tools:

Tile tool - add and remove tiles
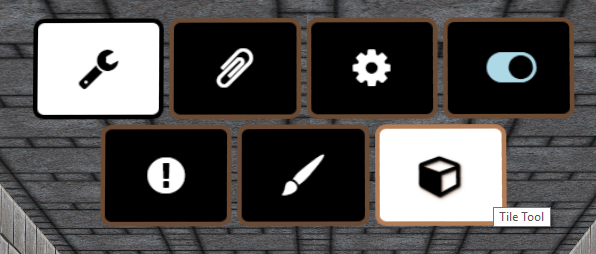

First thing you'd want to do when making the dungeon is to create some space: corridors, rooms, etc.
Tile tool will help you with both adding and removing dungeon tiles.
First click the tool to activate it and then click the wall in front of you to destroy it, thus creating a new tile, or click a tile in front of you to remove it. Keep in mind that destroying a block also removes any events and decorations on it.
Don't forget that you can also add and remove tiles when viewing the minimap without using the tile tool.
Decoration tool - decorate your dungeon and customize its looks


Now that you know how to expand your dungeon, it's time to learn to decorate it and customize its looks to your liking.
Decoration tool, besides letting you customize textures on any wall, ceiling or floor, allows you to put texts, images and Youtube videos anywhere - which can serve as clues that help to make progress in your dungeon - and even customize them using a CSS syntax (follow the link below to learn more and see examples).
To use the tool, first click to activate it and then click a wall, a ceiling or a floor in front of you to edit it. There are many ways to style texts and images, make sure to visit the following Wiki sections to learn more information about styling annd editing surfaces:
- Styling
- Editing Surfaces
Practice
Example 1: Golden rotated text with black background.


Let's put a golden slightly rotated text with the black background on some random wall. To do this, we need to select the decoration tool and click the wall directly in front of us. Then type some text in Msg / Img / Video field and paste the necessary CSS style in the style, which in our case would be: color: gold; background: black; transform: rotate(-30deg)


Example 2: Kitten image with green background, tooltip and a link to a private giveaway.


Let's put an image of a kitten on the wall! To do that, all we have to do is insert a link to the image in the Msg / Img / Video field, in our case it is https://ichef.bbci.co.uk/images/ic/720x405/p0517py6.jpg.
Now we can add a link to the giveaway in the Link field which will open in a new tab whenever it is clicked, e.g. https://www.steamgifts.com/giveaway/hqFyn/one-more-dungeon will take a player to the private SteamGifts giveaway. Keep in mind though it is a good way to share bonus giveaways in your dungeon, but the main ones better be shared as treasures which will be kept in the inventory and influence player's stats. More on that later in the Event tool section.
We can now make a tooltip - a message that will pop up whenever a mouse cursor gets over our decoration: just type the message in the Tooltip field, e.g. Sweet kitten.
Finally, let's add some texture! It can be any image, just like the one with the kitten, or some color, for example green in our case.
Here's how our filled fields would look:


Event tool - manage all kinds of events that will happen in your dungeon


Event tool allows you to create and edit event objects in your dungeon.
Just like with other tools, you first have to click to active it. After you do so, click a tile or a wall in front of you to add a new object or edit existing one. You will see multiple options which allow to configure your events in a wide variety of ways.
Visit the following Wiki section to learn more about ediiting event objects:
Practice
Example 1: A door that can be opened with a lever.


Let's see how objects can interact with each other, e.g. how a lever can open a door.
First things off, we should select the Event tool and create a door by clicking a wall in front of us. It already has two default images set for its closed and opened state - you can change those to any images you like or choose from the catalog of objects on this Wiki, e.g. catalog of doors can be found here.
Each object in a dungeon has its own unique ID which is used for other objects to interact with it. You can see it at the top when editing object settings.


Now we need to create a switch at some other place in the same way and make it trigger our door whenever it is used. It will already have certain default images set upon creation - just like any other object you can create.
When editing your new switch's settings, you can notice that some field there are different than those of the door, e.g. a switch can have target IDs! This is exactly the field we need to make our lever open our door - just insert the door ID here, e.g. 477 based on the screenshot above. You can also insert multiple IDs here separating them with comma to make a single switch trigger multiple objects at once - quite cool, huh?
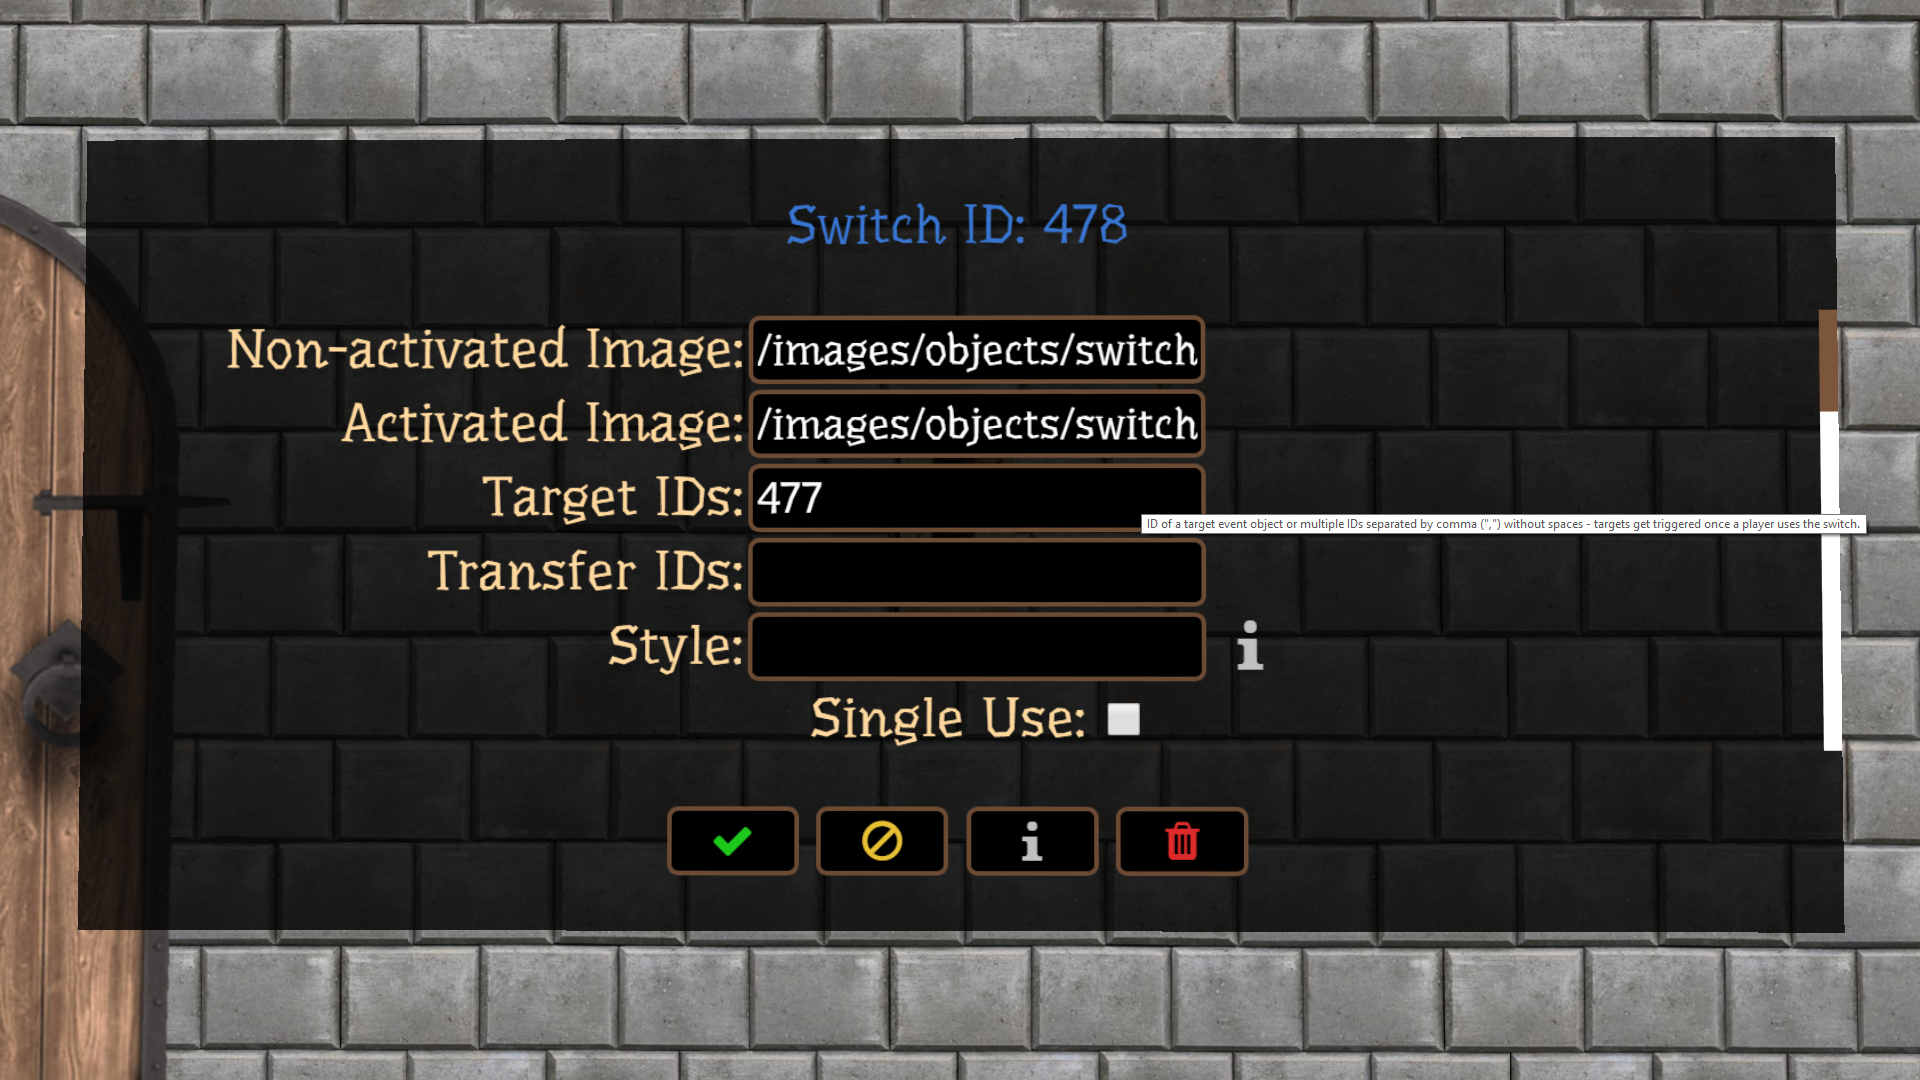

Try to interact with your new switch now and see how it opens and closes the door.
You can also modify object's looks using the style field in a similar way as you would do with decorations. Try inserting the following in the style field of your switch and see what happens:
opacity: .5; transform: rotate(90deg) scale(.5);


.png)
.png)
This transformation will make the switch half-transparent, half the size and rotate it by 90 degrees.
Dungeon settings


Settings option allows you to change general settings of your dungeon, such as its name, starting position or default textures.
More information on editing dungeon setting can be found in the following Wiki section:
- Dungeon Settings.
Ask your questions
If you have questions about dungeon creation in Dungeon Sandbox, feel free to post them in the corresponding Wiki section or ask them in the Discord chat: